Overview
This project is basically about opening the door on entering th password on keypad if the password is correct the door will open otherwise the gate will not open.
In this Door lock when the password is entered in the keypad the output will be shown in the LCD and if the password matches the door will get open.
Hardware required
- Arduino Uno R3
- Resistor
- Jumper Wires
- Potentiometer
- Buzzer
- LCD
- NPN transistor
- Buzzer
- Micro servo motor
- Keypad (4*4)
Schematic Diagram
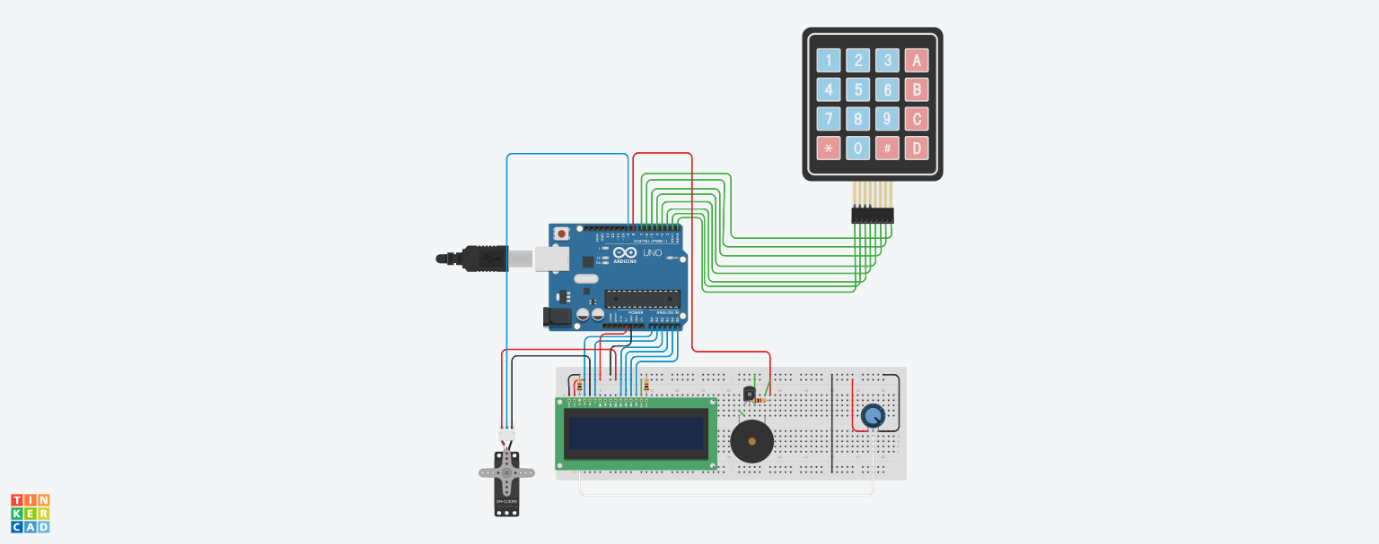
Fig 1. Circuit Diagram
Arduino Code :
#include <Keypad.h>

#include <LiquidCrystal.h>
#include <Servo.h>

Servo myservo;
int pos=0; // LCD Connections
LiquidCrystal lcd(A0,A1,A2,A3,A4,A5);
const byte rows=4;
const byte cols=3;

char key[rows][cols]={
{'1','2','3'},
{'4','5','6'},
{'7','8','9'},
{'*','0','#'}
};
byte rowPins[rows]={1,2,3,4};
byte colPins[cols]={5,6,7};
Keypad keypad= Keypad(makeKeymap(key),rowPins,colPins,rows,cols);
char* password="4567";
int currentposition=0;
int redled=10;
int greenled=11;
int buzz=8;
int invalidcount=12;


void setup()
{

displayscreen();
Serial.begin(9600);
pinMode(redled, OUTPUT);
pinMode(greenled, OUTPUT);
pinMode(buzz, OUTPUT);
myservo.attach(9);

lcd.begin(16,2);

}

void loop()
{
if( currentposition==0)
{
displayscreen();

}
int l ;
char code=keypad.getKey();
if(code!=NO_KEY)
{
lcd.clear();
lcd.setCursor(0,0);
lcd.print("PASSWORD:");
lcd.setCursor(7,1);
lcd.print(" ");
lcd.setCursor(7,1);
for(l=0;l<=currentposition;++l)
{

lcd.print("*");
keypress();
}

if (code==password[currentposition])
{
++currentposition;
if(currentposition==4)
{

unlockdoor();
currentposition=0;

}

}

else
{
++invalidcount;
incorrect();
currentposition=0;

}
if(invalidcount==5)
{

++invalidcount;
torture1();

}
if(invalidcount==8)
{
torture2();
}

}
// LOOP ENDS!!!//
}

//*******************************************OPEN THE DOOR FUNCTION!!!!***********************************************//

void unlockdoor()
{
delay(900);

lcd.setCursor(0,0);
lcd.println(" ");
lcd.setCursor(1,0);
lcd.print("Access Granted");
lcd.setCursor(4,1);
lcd.println("WELCOME!!");
lcd.setCursor(15,1);
lcd.println(" ");
lcd.setCursor(16,1);
lcd.println(" ");
lcd.setCursor(14,1);
lcd.println(" ");
lcd.setCursor(13,1);
lcd.println(" ");
unlockbuzz();

for(pos = 180; pos>=0; pos-=5) // goes from 180 degrees to 0 degrees
{
myservo.write(pos); // tell servo to go to position in variable 'pos'
delay(5); // waits 15ms for the servo to reach the position
}
delay(2000);


delay(1000);
counterbeep();

delay(1000);

for(pos = 0; pos <= 180; pos +=5) // goes from 0 degrees to 180 degrees
{ // in steps of 1 degree
myservo.write(pos); // tell servo to go to position in variable 'pos'
delay(15);


currentposition=0;

lcd.clear();
displayscreen();

}
}

//**********************************WRONG CODE FUNCTION*************************************************//

void incorrect()
{
delay(500);
lcd.clear();
lcd.setCursor(1,0);
lcd.print("CODE");
lcd.setCursor(6,0);
lcd.print("INCORRECT");
lcd.setCursor(15,1);
lcd.println(" ");
lcd.setCursor(4,1);
lcd.println("GET AWAY!!!");

lcd.setCursor(13,1);
lcd.println(" ");
Serial.println("CODE INCORRECT YOU ARE UNAUTHORIZED");
digitalWrite(redled, HIGH);
digitalWrite(buzz, HIGH);
delay(3000);
lcd.clear();
digitalWrite(redled, LOW);
digitalWrite(buzz,LOW);
displayscreen();
}
//****************************** CLEAR THE SCREEN!!!**********************//
void clearscreen()
{
lcd.setCursor(0,0);
lcd.println(" ");
lcd.setCursor(0,1);
lcd.println(" ");
lcd.setCursor(0,2);
lcd.println(" ");
lcd.setCursor(0,3);
lcd.println(" ");
}
//******************************KEYPRESS***********************************//
void keypress()
{


digitalWrite(buzz, HIGH);
delay(50);
digitalWrite(buzz, LOW);
}
//********************************DISPALAY FUNCTION!!!***********************************************************//
void displayscreen()
{

lcd.setCursor(0,0);
lcd.println("*ENTER THE CODE*");
lcd.setCursor(1 ,1);

lcd.println("TO _/_ (OPEN)!!");
}
//*************************** ARM SERVO****************************************************************************//
void armservo()
{

for (pos=180;pos<=180;pos+=50)
{
myservo.write(pos);
delay(5);
}
delay(5000);

for(pos=180;pos>=0;pos-=50)
{
myservo.write(pos);
}

}
//********************************UNLOCK BUZZ***********************************//
void unlockbuzz()
{

digitalWrite(buzz, HIGH);
delay(80);
digitalWrite(buzz, LOW);
delay(80);
digitalWrite(buzz, HIGH);
delay(80);
digitalWrite(buzz, LOW);
delay(200);
digitalWrite(buzz, HIGH);
delay(80);
digitalWrite(buzz, LOW);
delay(80);
digitalWrite(buzz, HIGH);
delay(80);
digitalWrite(buzz, LOW);
delay(80);
}

//*******************************COUNTER BEEP*************************************//
void counterbeep()
{
delay(1200);


lcd.clear();
digitalWrite(buzz, HIGH);

lcd.setCursor(2,15);
lcd.println(" ");
lcd.setCursor(2,14);
lcd.println(" ");
lcd.setCursor(2,0);
delay(200);
lcd.println("GET IN WITHIN:::");

lcd.setCursor(4,1);
lcd.print("5");
delay(200);
lcd.clear();
lcd.setCursor(2,0);
lcd.println("GET IN WITHIN:");
digitalWrite(buzz,LOW);
delay(1000);
//2
digitalWrite(buzz, HIGH);
lcd.setCursor(2,0);
lcd.println("GET IN WITHIN:");
lcd.setCursor(4,1); //2
lcd.print("4");
delay(100);
lcd.clear();
lcd.setCursor(2,0);
lcd.println("GET IN WITHIN:");
digitalWrite(buzz,LOW);
delay(1000);
//3
digitalWrite(buzz, HIGH);
lcd.setCursor(2,0);
lcd.println("GET IN WITHIN:");
lcd.setCursor(4,1); //3
lcd.print("3");
delay(100);
lcd.clear();
lcd.setCursor(2,0);
lcd.println("GET IN WITHIN:");
digitalWrite(buzz,LOW);
delay(1000);
//4
digitalWrite(buzz, HIGH);
lcd.setCursor(2,0);
lcd.println("GET IN WITHIN:");
lcd.setCursor(4,1); //4
lcd.print("2");
delay(100);
lcd.clear();
lcd.setCursor(2,0);
lcd.println("GET IN WITHIN:");
digitalWrite(buzz,LOW);
delay(1000);
//
digitalWrite(buzz, HIGH);
lcd.setCursor(4,1);
lcd.print("1");
delay(100);
lcd.clear();
lcd.setCursor(2,0);
lcd.println("GET IN WITHIN::");
digitalWrite(buzz,LOW);
delay(1000);
//5
digitalWrite(buzz, HIGH);
delay(40);
digitalWrite(buzz,LOW);
delay(40);
digitalWrite(buzz, HIGH);
delay(40);
digitalWrite(buzz,LOW);
delay(40);
digitalWrite(buzz, HIGH);
delay(40);
digitalWrite(buzz,LOW);
delay(40);
digitalWrite(buzz, HIGH);
delay(40);
digitalWrite(buzz,LOW);
lcd.clear();
lcd.setCursor(2,0);
lcd.print("RE-LOCKING");
delay(500);
lcd.setCursor(12,0);
lcd.print(".");
delay(500);
lcd.setCursor(13,0);
lcd.print(".");
delay(500);
lcd.setCursor(14,0);
lcd.print(".");
delay(400);
lcd.clear();
lcd.setCursor(4,0);
lcd.print("LOCKED!");
delay(440);
}
//*****************************TORTURE1****************************************//
void torture1()
{
delay(1000);
lcd.clear();
lcd.setCursor(2,0);
lcd.print("WAIT FOR ");
lcd.setCursor(5,1);
lcd.print("15 SECONDS");
digitalWrite(buzz, HIGH);
delay(15000);
digitalWrite(buzz, LOW);
lcd.clear();
lcd.setCursor(2,0);
lcd.print("LOL..");
lcd.setCursor(1,1);
lcd.print(" HOW WAS THAT??");
delay(3500);
lcd.clear();

}
//******************************TORTURE2*****************************************//
void torture2()
{
delay(1000);
lcd.setCursor(1,0);
lcd.print(" ");
lcd.setCursor(2,0);
lcd.print("EAR DRUMS ARE");
lcd.setCursor(0,1);
lcd.print(" PRECIOUS!! ");
delay(1500);
lcd.clear();
lcd.setCursor(1,0);
lcd.print(" WAIT FOR");
lcd.setCursor(4,1);
lcd.print(" 1 MINUTE");
digitalWrite(buzz, HIGH);
delay(55000);
counterbeep();
lcd.clear();
digitalWrite(buzz, LOW);
lcd.setCursor(2,0);
lcd.print("WANT ME TO");
lcd.setCursor(1,1);
lcd.print("REDICULE MORE??");
delay(2500);
lcd.clear();
lcd.setCursor(2,0);
lcd.print("Ha Ha Ha Ha");
delay(1700);
lcd.clear();
}
Precautions
- Connections should be done properly.
- Arduino is case Sensitive so code accordingly.
- Give different and appropriate colours to the wires.
- Use resistors for sensors and LCD’s.