Understanding the Need for Automatic Doors
Imagine a world where opening a door is no longer challenging for those who can’t walk or see. Automatic doors address this need by offering a seamless solution. The core of this innovation is a door lock sensor that detects motion, allowing the door to open automatically. This project is not just a convenience; it’s a transformative tool for enhancing accessibility and independence.
How Do Automatic Doors Work?
The technology behind automatic doors is both fascinating and functional. At its heart is an ultrasonic sensor that detects motion and triggers the door to open. This system can be fine-tuned to respond to specific distances, ensuring it only opens when needed. The sensor is connected to an Arduino Uno R3, which processes the signal and activates a servo motor to open the door.
Hardware Required for Building an Automatic Door
To create your own automatic door, you will need:
- Arduino Uno R3: The brain of the operation, processing signals, and controlling the motor.
- Resistor: Ensures the proper flow of current.
- Jumper Wires: Connect various components.
- Ultrasonic Sensor: Detects the presence of a person.
- Breadboard: A platform for assembling the circuit.
- Servo Motor: Mechanically opens and closes the door.

Step-by-Step Guide to Building an Automatic Door
1. Setting Up the Hardware
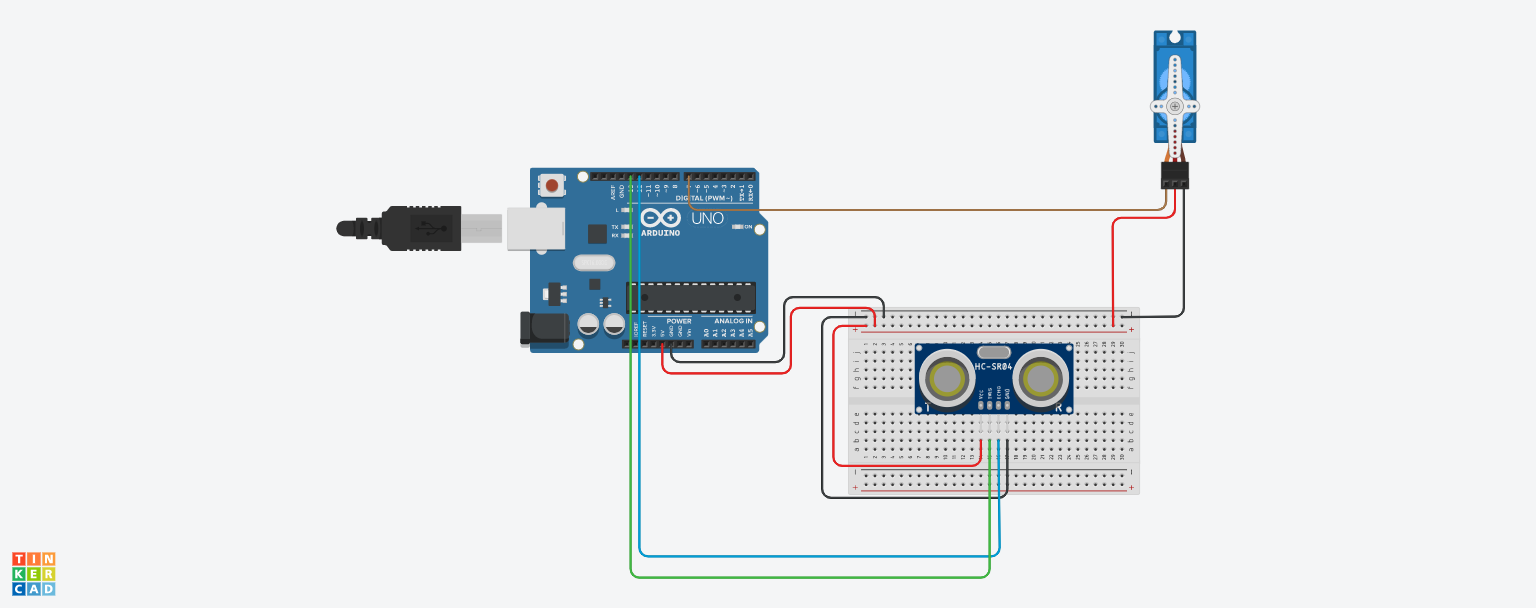
Begin by assembling all the components on the breadboard. Connect the ultrasonic sensor to the Arduino Uno R3, ensuring that the connections are secure and correct. The servo motor should also be connected to the Arduino, ready to receive signals and actuate the door mechanism.
2. Writing the Arduino Code
The Arduino code is crucial for the operation of the automatic door. Below is a simple script to get you started:
#include <Servo.h>
Servo srv;
#define maxdistance 100

void setup() {
  Serial.begin(9600);
  pinMode(13, OUTPUT);
  pinMode(12, INPUT);
  srv.attach(7);
}

void loop() {
  digitalWrite(13, LOW);
  delay(1000);
  digitalWrite(13, HIGH);
  delay(1000);
  digitalWrite(13, LOW);
  int d = pulseIn(12, HIGH);
  d = d / 29 / 2;
  Serial.println(d);
  if (d <= maxdistance) {
    srv.write(90);
    delay(1000);
  } else {
    delay(1000);
    srv.write(0);
  }
}
3. Connecting Everything Together
Follow the schematic diagram to connect the hardware components properly. This ensures that the signals from the ultrasonic sensor are correctly processed by the Arduino, which in turn controls the servo motor.
4. Testing the Setup
Once everything is connected and the code is uploaded to the Arduino, test the setup by moving in front of the ultrasonic sensor. The door should open when motion is detected within the specified range.
Precautions When Building an Automatic Door
Building an automatic door is a straightforward project, but certain precautions must be taken to ensure success:
- Proper Connections: Ensure all connections are secure and correct to avoid malfunctions.
- Arduino Code Sensitivity: The code is case-sensitive, so be meticulous when typing it out.
- Color-Coded Wires: Use different colors for the wires to identify connections easily.
- Use Resistors: Protect sensors and components from damage by using appropriate resistors.
Benefits of Automatic Doors
Automatic doors are not just about convenience. They represent a significant improvement in accessibility for people with mobility or vision impairments. By eliminating the need to manually open doors, they provide a more inclusive environment.
Enhancing Independence
For individuals who find it challenging to open doors manually, automatic doors offer a level of independence that is both empowering and practical. This technology allows them to navigate spaces with ease, enhancing their overall quality of life.
Practical Applications
Automatic doors are commonly seen in commercial spaces, but their application extends to residential settings as well. Imagine a home where every door operates seamlessly, making daily life easier for everyone, especially those with disabilities.
Future of Automatic Doors
As technology advances, the future of automatic doors looks even more promising. Innovations in sensor technology and artificial intelligence could lead to doors that anticipate movements and preferences, offering even greater convenience and security.
Integration with Smart Home Systems
One exciting possibility is the integration of automatic doors with smart home systems. This would allow for seamless control of all doors in a home through a single interface, enhancing the smart living experience.
Energy Efficiency
Future designs may also focus on energy efficiency, ensuring that automatic doors contribute to sustainable living by minimizing energy consumption.
Conclusion
Automatic doors are more than just a technological novelty; they are a vital tool for creating inclusive and accessible environments. By understanding the hardware, software, and practical benefits, you can build a system that enhances the quality of life for those with mobility and vision impairments.