Overview
A calculator is a device used to solve mathematical problems easily and in a fast way this calculator can Add, Subtract, Multiply, and Divide.
In this project, we have used a (4*4) keypad to take input and an LCD to show output. A potentiometer is also used to adjust the LCD to show the output. Keys used
A – Addition
B – Subtract
C – Multiplication
D – Divide
Hardware required
- Arduino Uno R3
- Potentiometer
- Keypad 4*4
- Resistor
- LCD
- Jumper Wires
Schematic Diagram
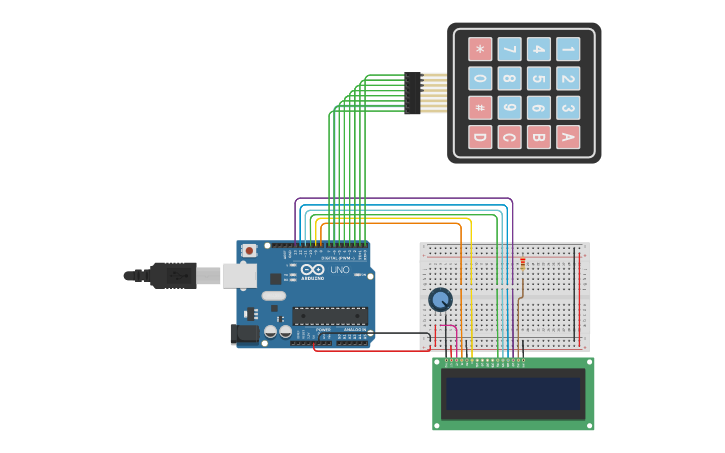
Fig 1. Circuit Diagram
Arduino Code :
#include <LiquidCrystal.h>
#include <Keypad.h>
const byte ROWS = 4;
const byte COLS = 4;
char keys[ROWS][COLS] = {
{‘1′,’2′,’3′,’A’},
{‘4′,’5′,’6′,’B’},
{‘7′,’8′,’9′,’C’},
{‘*’,’0′,’#’,’D’}
};
byte rowPins[ROWS] = { 0, 1, 2, 3 };
byte colPins[COLS] = { 4, 5, 6, 7 };
Keypad kpd = Keypad( makeKeymap(keys), rowPins, colPins, ROWS, COLS );
const int rs = 8, en = 9, d4 = 10, d5 = 11, d6 = 12, d7 = 13;
LiquidCrystal lcd(rs, en, d4, d5, d6, d7);
long Num1,Num2,Number;
char key,action;
boolean result = false;
void setup() {
lcd.begin(16, 2);
lcd.print(“Calculator”);
lcd.setCursor(0, 1);
lcd.print(“-Raghav”);
delay(2000);
lcd.clear();
}
void loop() {
key = kpd.getKey();
if (key!=NO_KEY)
DetectButtons();
if (result==true)
CalculateResult();
DisplayResult();
}
void DetectButtons()
{
lcd.clear();
if (key==’*’)
{Serial.println (“Button Cancel”); Number=Num1=Num2=0; result=false;}
if (key == ‘1’)
{Serial.println (“Button 1”);
if (Number==0)
Number=1;
else
Number = (Number*10) + 1;
}
if (key == ‘4’)
{Serial.println (“Button 4”);
if (Number==0)
Number=4;
else
Number = (Number*10) + 4;
}
if (key == ‘7’)
{Serial.println (“Button 7”);
if (Number==0)
Number=7;
else
Number = (Number*10) + 7;
}
if (key == ‘0’)
{Serial.println (“Button 0”);
if (Number==0)
Number=0;
else
Number = (Number*10) + 0;
}
if (key == ‘2’)
{Serial.println (“Button 2”);
if (Number==0)
Number=2;
else
Number = (Number*10) + 2;
}
if (key == ‘5’)
{Serial.println (“Button 5”);
if (Number==0)
Number=5;
else
Number = (Number*10) + 5;
}
if (key == ‘8’)
{Serial.println (“Button 8”);
if (Number==0)
Number=8;
else
Number = (Number*10) + 8;
}
if (key == ‘#’)
{Serial.println (“Button Equal”);
Num2=Number;
result = true;
}
if (key == ‘3’)
{Serial.println (“Button 3”);
if (Number==0)
Number=3;
else
Number = (Number*10) + 3;
}
if (key == ‘6’)
{Serial.println (“Button 6”);
if (Number==0)
Number=6;
else
Number = (Number*10) + 6;
}
if (key == ‘9’)
{Serial.println (“Button 9”);
if (Number==0)
Number=9;
else
Number = (Number*10) + 9;
}
if (key == ‘A’ || key == ‘B’ || key == ‘C’ || key == ‘D’)
{
Num1 = Number;
Number =0;
if (key == ‘A’)
{Serial.println (“Addition”); action = ‘+’;}
if (key == ‘B’)
{Serial.println (“Subtraction”); action = ‘-‘; }
if (key == ‘C’)
{Serial.println (“Multiplication”); action = ‘*’;}
if (key == ‘D’)
{Serial.println (“Division”); action = ‘/’;}
delay(100);
}
}
void CalculateResult()
{
if (action==’+’)
Number = Num1+Num2;
if (action==’-‘)
Number = Num1-Num2;
if (action==’*’)
Number = Num1*Num2;
if (action==’/’)
Number = Num1/Num2;
}
void DisplayResult()
{
lcd.setCursor(0, 0);
lcd.print(Num1); lcd.print(action); lcd.print(Num2);
if (result==true)
{lcd.print(” =”); lcd.print(Number);}
lcd.setCursor(0, 1);
lcd.print(Number);
}
Precautions
- Connections should be done properly.
- Arduino is case sensitive so code accordingly.
- Give different colours to the wires.
- Adjust potentiometer to get output on LCD.