
Our objective in this game is to create a maze and guide our character through it to the endpoint.
The first step for this is to create the maze in the background. But we are not going to create just the maze. We are also going to create a few more backdrops for different scenarios.
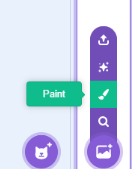
Number 1 is our start screen. We make this backdrop by selecting the Paint option in our backdrop selection and renaming it to StartScreen.
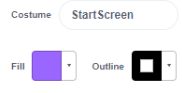
We fill in the entire screen with a rectangle of red color with a thick purple outline. We also added a text saying “LET’S GET STARTED”.

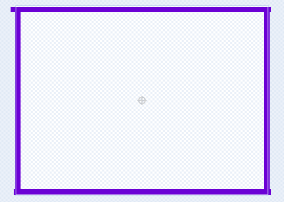
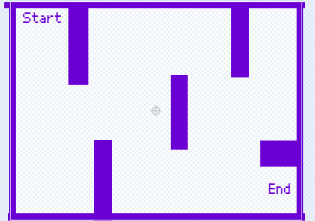
This is our start screen. Next we make the screen with the maze on it. Rename it to MazeScreen. We will make our maze using rectangles. First, we make the borders. And then add the different pathways.
Now we have our MazeScreen. We have two more screens to go. A winner screen and a loser screen. For WinScreen, we have our red background with purple borders, the same as our StartScreen. Then we just put in a text of congratulations.

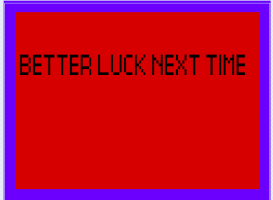
Similarly, we make the LoseScreen with the loss text.
Next, we start choosing and creating our sprites.
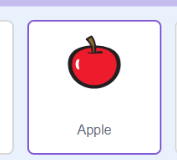
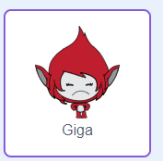
We choose the sprites Giga and Apple. We also choose Button 2.
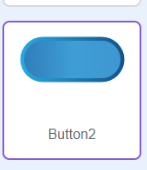
Now we need to design our Button2 using the Costumes tab after selecting Button2 sprite.
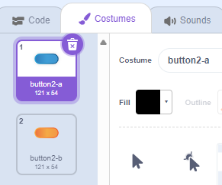
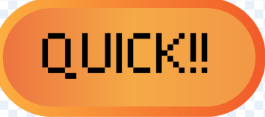
The first button should show the text “CLICK ME” and the next costume of the button should show the text “QUICK!!!”

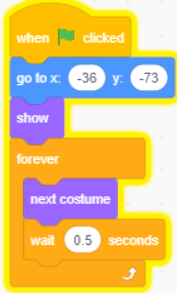
We continue with coding button 2. As usual, we have our “when green flag clicked” block. Under this, we set the x and y position of the button and added the “show” block to display our button. After which we join a “forever” block to keep our next action of switching between the two costumes of the buttons executing continuously. We get a “next costume” block from Looks and a “wait __ seconds” block for “0.5 seconds”.
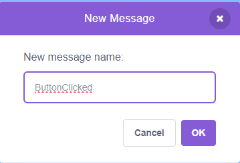
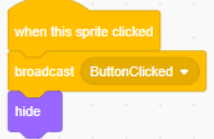
We also want to alert the other components when this button is clicked to start the game. We take a “when this sprite clicked” Event block. Join a “broadcast message” block and add a new message of “ButtonClicked”. And lastly, hide this button.

Now we code our Giga and Apple Sprites.
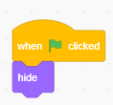
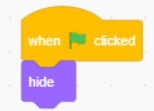
For Giga, our first set of code is to hide Giga when the green flag is clicked, i.e., when the game restarts.
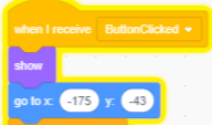
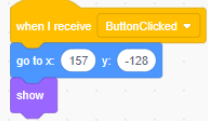
Our second set of code for Giga is the main code which details what occurs when the button on the StartScreen is clicked. So we take the block “when I receive ButtonClicked” and the first thing we do is set the start position using the “go to x:_ y:_” block with x as “-175” and y as “-43” and show Giga. Adjust the size of Giga as per convenience.
We want the next parts to run continuously so we add the “forever” block and 3 different “if__ then” blocks inside for different conditions.
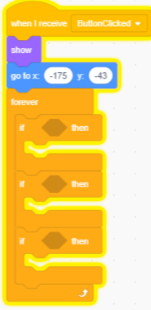

Our first condition is going to be of Giga touching the maze barriers and edges. Since the maze is not a sprite,, we put the condition of “touching _color_ ?” the color is purple. If that condition is true, then decrease the variable Lives by “-1” by using the block “change Lives by –1″. We also make it go back to the starting position by duplicating the earlier “go to x:_ y:_” block.
The second condition is that Giga touches the apple. So our condition will be “touching Apple?” the actions for that are going to be displaying a “yay!!” text and broadcasting a message of “WonGame”. We also hide Giga.

Our last condition is of Lives being over. Here we will use an “__ =__” Operator block for the condition and fill it in as “Lives = 0 “. Our course of action for this will be to set the Lives back to 4 by “set Lives to 4” variable block, broadcasting a “LostGame” message and hiding Giga.

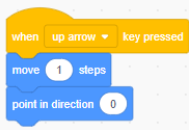
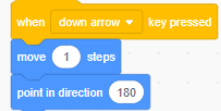
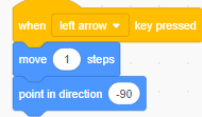
Now we have four small sets of code defining how it will move according to our arrow keys.

That concludes our code for Giga. We move on to coding the Apple.
All we have to do here is hide the apple when the green flag is clicked and show Apple “when I receive ButtonClicked” as well as set its position.
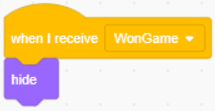
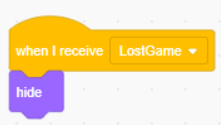
Similarly, we want to “hide” Apple “when I receive WonGame” and “when I receive LostGame”.
We’re done coding the Apple.
With all our Sprites coded and backdrop costumes ready, we now move on to coding the backdrop. We want the screen to switch to StartScreen once the green flag is clicked. So, as usual, we take our “when green flag clicked” block and add a “switch backdrop to __” Looks Block and choose the option for StartScreen. We also make a variable “Lives” which will show the number of lives we have when the game is running. Since the game will not have started yet at StartScreen, we hide our “Lives” variable.

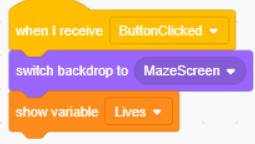
We want our game to start when we click the button on the screen. For that we use “when I receive ButtonClicked” and switch the backdrop to the MazeScreen while showing the Lives variable.
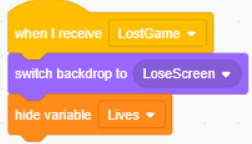
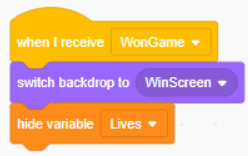
Similarly, we want the backdrop to switch to LoseScreen “when I receive LostGame” and switch to WinScreen “when I receive WonGame”. We also want to hide the Lives variable for both of these.
Our game is ready to play!!
CHALLENGES
You have now gained some insight and practice into the world of Scratch programming. We want to challenge you to put those earned skills to the test by presenting a few creative challenges to complete!
- DANCE PARTY:- Animate characters to show them dancing in a dance party.
- CAR RACING GAME:- Code a car racing game where the car has to dodge obstacles in its path.
- TIC TAC TOE GAME:- Create a tic tac toe game.
- CATCH GAME:- Create a game where the player has to use a bowl to catch falling balls.
- MATH QUIZ:- Try to create a simple math quiz.
Kindly suggest your own projects or tips and tricks you have learned, in the comments.


This Post Has 2 Comments
I truly savored what you’ve accomplished here. The sketch is elegant, your authored material trendy, however, you seem to have developed some trepidation about what you aim to offer next. Certainly, I shall revisit more regularly, just as I have been doing nearly all the time, in case you uphold this ascension.
The breadth of knowledge compiled on this website is astounding. Every article is a well-crafted masterpiece brimming with insights. I’m grateful to have discovered such a rich educational resource. You’ve gained a lifelong fan!