Light Sensor with Arduino in Tinkercad: Control LED Automatically
Overview:
This project tells about how to use a photoresistor sensor to glow an LED. This is very useful to detect light.
In this project, when there is light present, the LED will be on, and at night, the LED will automatically turn on.
Hardware required
- Arduino Uno R3
- LED
- Resistor
- Jumper Wires
- Photoresistor Sensor
Schematic Diagram
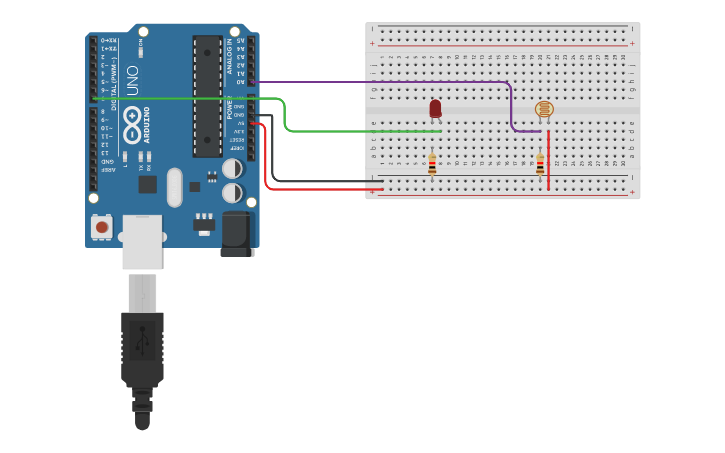
Fig 1. Circuit Diagram
Arduino Code :
int light = 0; // store the current light value

void setup() {
    // put your setup code here, to run once:
    Serial.begin(9600); //configure serial to talk to computer
    pinMode(7, OUTPUT); // configure digital pin 7 as an output
}

void loop() {
    // put your main code here, to run repeatedly:
    light = analogRead(A0); // read and save value from PR

    Serial.println(light); // print current light value

    if(light > 450) { // If it is bright...
        Serial.println("It is quite light!");
        digitalWrite(7,LOW); //turn  LED off
    }
    else if(light > 229 && light < 451) { // If it is average light...
        Serial.println("It is average light!");
       digitalWrite(7, HIGH); // turn LED on
    }
    else { // If it's dark...
        Serial.println("It is pretty dark!");
        digitalWrite(7,HIGH); // Turn  LED on
    }
    delay(1000); // don't spam the computer!
}
Precautions
- Connections should be done properly.
- Arduino is case Sensitive, so code accordingly.
- Give different and appropriate colours to the wires.
- Use resistors for sensors and LEDs.
Conclusion with Maker’s Muse
The Light Sensor with Arduino in Tinkercad project shows how simple components like a photoresistor and LED can create smart, automated systems. By detecting light levels, the Arduino makes decisions just like intelligent devices in real life.
This project encourages beginners to embrace experimentation and discover the possibilities of sensor-driven automation. Guided by the maker’s muse, every prototype builds confidence and creativity for future innovations.
For more inspiration in sensor-based projects, explore this Arduino Security Alarm project and keep pushing the boundaries of what you can create.