How to Make a Geometry Dash Game on Scratch for Kids
In today’s digital world, children are surrounded by games, apps, and interactive content. But what if instead of only playing games, kids could actually build one themselves? Learning to create games not only boosts creativity but also develops logical thinking, problem-solving skills, and confidence. One of the best platforms to start this journey is Scratch.
Scratch is a beginner-friendly programming platform developed by MIT. It allows children to build animations, stories, and games using simple drag-and-drop coding blocks. There is no need to type complex code or worry about syntax errors. Everything works visually, which makes it perfect for beginners.
One of the most exciting beginner projects in Scratch is creating a Geometry Dash-style game. Geometry Dash is a fast-paced 2D obstacle game where players control a square character that must jump over spikes and obstacles. The concept is simple, but the gameplay is thrilling and addictive. Recreating a simplified version of this game in Scratch is a fantastic way for kids to understand how real games work behind the scenes.
When children build this project, they learn essential programming concepts such as loops, conditions, variables, motion, and collision detection. They also understand how game mechanics work, including scoring systems, character movement, obstacle spawning, and game-over logic. Instead of memorising theory, they apply concepts practically while having fun.
This project is ideal for beginners because it focuses on one main action: jumping. The player presses the space key to jump and avoid spikes. If the character touches an obstacle, the game ends. While the concept sounds simple, building it step by step teaches powerful programming fundamentals.

Another benefit of this project is creativity. Kids can design their own characters, create unique backdrops, choose different colours, and even add sound effects or background music. Once the basic game is complete, they can extend it by adding levels, increasing difficulty, or introducing power-ups.
In this detailed guide, we will walk through every step required to build your own Geometry Dash-style game using Scratch. By the end of this tutorial, you will have a fully working game that includes:
- A custom-designed player sprite
- Moving spike obstacles
- Smooth jumping animation
- A scoring system
- Collision detection
- A game-over screen
Whether you are a beginner learning Scratch for the first time or a parent helping your child explore coding, this step-by-step guide will make the process simple and enjoyable.
Let’s begin building your own Geometry Dash game on Scratch.
What Is a Geometry Dash Game on Scratch?
A Geometry Dash-style game is a simple 2D obstacle game. The player controls a character, usually a square, that moves forward automatically. The only control the player has is jumping. The goal is to avoid hitting obstacles like spikes. If the player touches an obstacle, the game ends and restarts.


In Scratch, we recreate this concept using sprites, motion blocks, control blocks, sensing blocks, and variables. For simplicity, we will create a single endless level instead of multiple levels.
Set Up Your Project
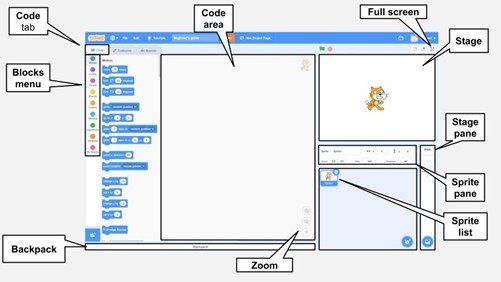
First, open the Scratch website and log in to your account. Click on Create to open a new project.


Delete the default cat sprite since we will design our own character.
Now choose or design your backdrop. Click the Choose a Backdrop icon in the bottom right corner. You can either select an existing background or click the paintbrush icon to design your own.
For this game, create two backdrops:
- A main gameplay backdrop with a simple colored background and a pathway at the bottom.
- A second backdrop for the Game Over screen.
The main backdrop will be used while playing, and the Game Over backdrop will appear when the player crashes.
Create the Player Sprite
![]()
Next, design the player sprite. Click on the Choose a Sprite button and select the paint option.
Draw a square shape. This square will represent the player. You can choose any colour you like. Keep it simple and clear.
Position the square near the left side of the screen, slightly above the pathway. This will be the starting position of the player.
Now create the obstacle sprite. Again, click Choose a Sprite and select the paint option. Draw a triangle shape to represent spikes.
To make the game more interesting, create three or four different costumes for the spike sprite. Slightly change the shape or size of each costume. Later, we will randomly select between these costumes to create variety.
Make a Variable to Score Points
To track how long the player survives, we need a score variable.
Click on the Variables category and select Make a Variable. Name it score and make it available for all sprites.
This variable will increase continuously as long as the player avoids the spikes.
Program the Jumping Movement
Select the player sprite to start coding.

First, set the starting position of the player:
- When the green flag is clicked
- Show
- Point in direction 90
- Go to x: -152 y: -104
Now program the jump.
Add a Forever loop. Inside it, add an If condition with the Key space pressed.
When the space key is pressed:
- Repeat 10 → Turn clockwise 10 degrees and Change y by 10
- Repeat 10 → Turn clockwise 10 degrees and Change y by -10
- Point in direction 90
This creates a smooth jumping motion.
Create and Program Obstacles


Select the spike sprite.
Start with:
- When the green flag clicked
- Set score to 0
- Hide
Add a Forever loop:
- Create a clone of myself
- Wait 1 second
Now program the clone behaviour:
- When I start as a clone
- Show
- Go to x: 170 y: -108
- Switch costume to pick a random 1 to 3
- Glide 1 sec to x: -280 y: -108
- Delete this clone
This makes spikes appear from the right, move across the screen, and disappear.
Add Collision Detection

Select the player sprite.
Add:
- When the green flag is clicked
- Forever
- If touching a spike
- Switch backdrop to Game Over
- Stop all
- If touching a spike
This ensures the game ends when the square touches a spike.
Add Score Logic
Add:
- When the green flag is clicked
- Forever
- Repeat until touching the spike
- Change score by 1
- Repeat until touching the spike
The score increases as long as the player survives.
Hide the Player on Game Over
On the player sprite, add:
- When the backdrop switches to Game Over
- Hide
- Play the sound until it’s done
Now the square disappears when the game ends.
Conclusion
Building a Geometry Dash-style game in Scratch helps kids understand core programming concepts such as loops, conditions, variables, events, motion, and cloning. It combines creativity with logical thinking.
By following these steps and experimenting with improvements like new levels, faster obstacles, or power-ups, children can transform a simple project into a complete game.
Open Scratch and start building your own Geometry Dash-style game today.