What is ATL and Why Should You Care?
Atal Tinkering Labs (ATL) are special spaces in schools where students can learn by doing. These labs help you think like an inventor, solve real problems, and create amazing things with your own hands. If you are a student who loves to explore, build, and discover new things, ATL is the perfect place for you.
ATL projects are not just school assignments. They are your chance to become a young innovator and make something that can help people in your community.
The Ultimate Guide to ATL Project Implementation to Understanding ATL Projects: The Basics You Need to Know
What Makes ATL Projects Special?
ATL projects differ from regular homework because they focus on solving real problems. Instead of just reading about science, you do science. Instead of just learning about technology, you create technology.
Here are the main features of ATL Project Implementation:
- They solve real-world problems
- They use science, technology, engineering, and math together
- They encourage creativity and new ideas
- They help you work in teams
- They connect classroom learning to everyday life
Types of ATL Projects You Can Create
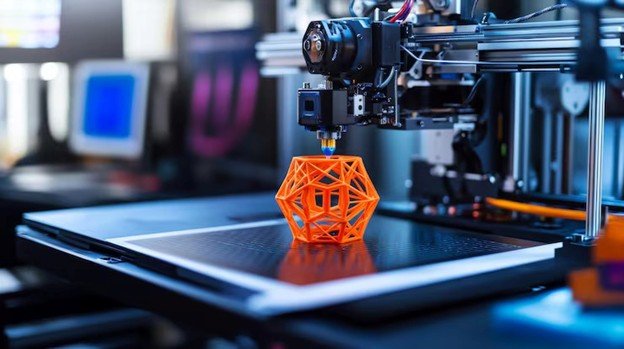
Technology Projects: These projects use computers, sensors, and electronic parts to solve problems. Examples include making a smart dustbin or creating an app to help farmers.
Science Projects: These focus on understanding how things work in nature and using that knowledge to help people. You might study water pollution or test different materials for strength.
Engineering Projects: These projects involve building and designing things. You could design a better wheelchair or create a device to save water.
Social Innovation Projects: These projects aim to help your community. You might create a system to reduce food waste or design something to help elderly people.

Step 1: Finding Your Perfect Project Idea
Start with Problems You See Every Day
The best ATL projects begin with problems you notice around you. Look at your home, school, and neighbourhood. What bothers you? What could be better?
Ask Yourself These Questions:
- What problems do your family members face daily?
- What issues do you see in your school?
- What challenges does your community have?
- What would make life easier for people around you?
Research and Explore Different Solutions
Once you have identified a problem, research how others have tried to solve it. Look online, talk to teachers, and ask your family members. This research will help you understand the problem better and think of new solutions.
Research Tips for Students:
- Use simple keywords when searching online
- Check if someone has already solved this problem
- Look for gaps in existing solutions
- Write down interesting facts you discover
- Save useful websites and articles
Choose a Project That Matches Your Skills
Pick a project that challenges you but is not impossible to complete. Consider what materials you can get, what skills you have, and how much time you can spend on the project.

Step 2: Planning Your ATL Project Implementation Like a Pro
Create a Simple Project Plan
Good planning makes your project much easier to complete. Write down what you want to achieve, when you want to finish, and what you need to get there.
Your Project Plan Should Include:
- Clear goal statement
- List of materials needed
- Timeline with important dates
- Team member roles (if working in a group)
- Expected challenges and solutions
Set Realistic Goals and Timelines
Many students make the mistake of planning projects that are too big or too complicated. Start with something simple that you can finish. You can always make it better later.
Timeline Planning Tips:
- Break your project into small tasks
- Give yourself extra time for each task
- Plan for problems and delays
- Set weekly goals to track progress
- Ask your teacher to review your timeline
Gather Your Resources and Materials
Make a complete list of everything you need for your project. This includes physical materials, software, books, and help from other people.
Common ATL Project Materials:
- Arduino boards and sensors
- Cardboard and craft materials
- Basic electronic components
- Computer with internet access
- Measuring tools and safety equipment
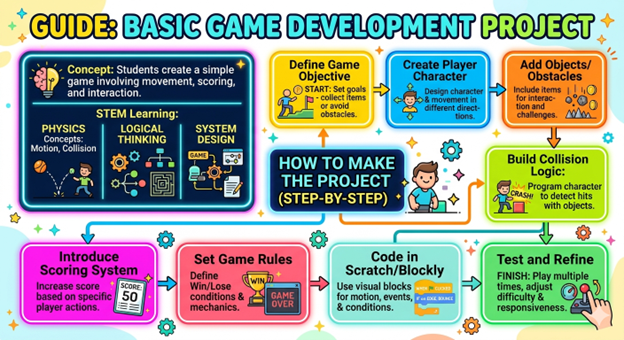
Step 3: Building and Testing Your Project
Start with a Simple Prototype
A prototype is a basic version of your project that shows how it will work. Don’t worry about making it perfect at first. The goal is to test your main idea and see if it works.
Prototyping Steps:
- Build the most important part first
- Test it quickly to see if it works
- Make notes about what works and what doesn’t
- Show it to friends and teachers for feedback
- Make improvements based on what you learn
Test Early and Test Often
Testing is the most important part of building any project. Every time you add something new, test it to make sure it still works. This approach helps you find problems early when they are easier to fix.
Effective Testing Strategies:
- Test each part of your project separately
- Keep a record of all your tests
- Ask other people to try using your project
- Look for ways your project might break
- Make a list of improvements for later
Learn from Failures and Improve
Every ATL project has problems and failures. This is normal and helpful for learning. When something doesn’t work, try to understand why and use that knowledge to make your project better.
Step 4: Presenting Your ATL Project Successfully
Prepare a Clear and Simple Presentation
Your presentation should explain your project in a way that anyone can understand. Start with the problem you solved, show how your solution works, and explain why it is better than other options.
Presentation Structure:
- Introduction: What problem did you solve?
- Solution: How does your project work?
- Testing: What did you discover during testing?
- Impact: How does this help people?
- Future plans: How could you make it better?
Practice Your Presentation Skills
Good presentation skills help people understand and remember your project. Practice explaining your project to family members, friends, and teachers before the final presentation.
Presentation Tips:
- Speak slowly and clearly
- Use simple words that everyone understands
- Show your project while you talk about it
- Make eye contact with your audience
- Be ready to answer questions about your project
Document Your Project Journey
Keep a record of your entire project process. Take photos, write about your challenges, and save all your research. This documentation helps you remember what you learned and shows others how you solved problems.
Common Challenges and How to Overcome Them
Problem: Limited Resources and Materials
Solution: Be creative with what you have. Use recyclable materials, borrow equipment when possible, and focus on projects that don’t require expensive components. Many successful ATL projects use simple, everyday materials.
Problem: Technical Difficulties
Solution: Break complex problems into smaller parts. Ask teachers, classmates, or online communities for help. Remember that learning from mistakes is part of the process.
Problem: Time Management Issues
Solution: Work on your project a little bit every day instead of trying to finish everything at once. Set small, daily goals and celebrate when you achieve them.
Problem: Team Coordination Problems
Solution: Assign clear roles to each team member, meet regularly to discuss progress, and communicate openly about challenges and concerns.
Benefits of ATL Projects for Your Future
Skills You Develop Through ATL Projects
Technical Skills:
- Basic programming and electronics
- Problem-solving and critical thinking
- Research and analysis abilities
- Project management and planning
Soft Skills:
- Communication and presentation abilities
- Teamwork and collaboration
- Creativity and innovation
- Patience and persistence
How ATL Projects Help Your Academic Growth
ATL projects make classroom learning more interesting and meaningful. When you build something that uses math, science, and technology together, you understand these subjects much better than just reading about them in textbooks.
Career Opportunities and Future Pathways
Students who participate in ATL projects often develop interests in engineering, technology, science, and innovation. Many go on to study these subjects in college and build careers as inventors, engineers, scientists, and entrepreneurs.
Getting Started: Your First ATL Project
Choose a Simple Project for Your First Attempt
For your first ATL project, pick something simple that you can complete in a few weeks. This builds your confidence and teaches you the basic process of project development.
Good First Project Ideas:
- Smart plant watering system
- Simple home security alarm
- Energy-saving device for your school
- Mobile app to help students organise homework
Find Support and Guidance
Don’t try to do everything alone. Ask your teachers for guidance, work with classmates who have different skills, and use online resources to learn new techniques.
Sources of Help:
- ATL teachers and coordinators
- Online tutorials and courses
- Student forums and communities
- Local experts and professionals
- Senior students who have completed ATL projects
Conclusion: Start Your ATL Journey Today
ATL projects offer an amazing opportunity to learn by doing, solve real problems, and develop skills that will help you throughout your life. The key to success is starting simple, being persistent, and learning from every challenge you face.
Remember that every expert was once a beginner. Your first ATL project doesn’t have to change the world, but it should teach you something new and help you grow as a student and future innovator.
Take the first step today. Look around you, identify a problem that interests you, and start planning your solution. Your ATL journey begins with a single idea and the courage to try something new.
The future belongs to students who can think creatively, solve problems effectively, and turn ideas into reality. ATL projects give you the perfect opportunity to develop these essential skills while having fun and making a positive impact on your community.
Frequently Asked Questions (FAQs) About ATL Projects
Q1: What does ATL stand for, and who can participate?
A: ATL stands for Atal Tinkering Lab. Any student from class 6th to 12th studying in schools with ATL facilities can participate. The program is designed to encourage innovation and creativity among young minds across India.
Q2: How much time should I spend on my ATL project?
A: Most ATL projects take 2-3 months to complete if you work on them regularly. Spend at least 1-2 hours per week on your project. Remember, consistent small efforts work better than trying to finish everything in a few days.
Q3: Do I need to have programming skills to start an ATL project?
A: No, programming skills are not mandatory. Many successful ATL projects use simple materials and basic concepts. However, if your project requires programming, there are many free online tutorials, and your ATL teacher can help you learn the basics.
Q4: Can I work alone, or do I need a team for ATL projects?
A: You can work both individually and in teams of 2-4 students. Team projects allow you to combine different skills and ideas, but individual projects give you complete control over your work. Choose based on your project requirements and personal preference.
Q5: What if my project doesn’t work as expected?
A: This is completely normal and part of the learning process. Document what went wrong, try to understand why it happened, and use this knowledge to improve your project. Many successful inventions came from multiple failures and improvements.