Best Platforms for Beginners to Build Android Apps Without Coding Using MIT App Inventor
Introduction to Mobile App and MIT AI
In today’s digital world, mobile phones are not just devices for calling or messaging. They are powerful tools used for learning, entertainment, communication, shopping, banking, and even managing daily tasks. All of these functions are made possible through mobile applications.
A mobile app is a software program designed to work on smartphones and tablets. There are different types of mobile apps such as educational apps, gaming apps, productivity apps, health apps, and social media apps. Every time we open a calculator, watch a video, book a cab, or attend an online class, we are using a mobile app.
For school students, understanding how these apps are created can be very exciting. However, traditional app development usually requires learning programming languages like Java or Kotlin, which may feel complicated for beginners. This is where MIT App Inventor becomes an excellent starting point.
MIT App Inventor is a web-based platform created by the Massachusetts Institute of Technology to make app development simple and accessible to everyone, especially students. Instead of typing complex code, users create apps by dragging and connecting visual blocks. This approach reduces confusion and allows learners to focus on understanding logic and creativity.
MIT AI was specially designed with education in mind. It helps students:
- Understand the basic structure of a mobile app
- Learn how user interfaces are designed
- Develop logical thinking skills
- Experiment and test ideas instantly
- Build confidence in technology
Another important advantage is that students can see their app working on a real Android device. This makes the learning process practical and motivating. When students realise that they can create their own working app, it increases their interest in computer science and innovation.
In simple terms, MIT App Inventor acts as a bridge between curiosity and real app development. It allows school students to move from being app users to becoming app creators.
Designer Window and Blocks
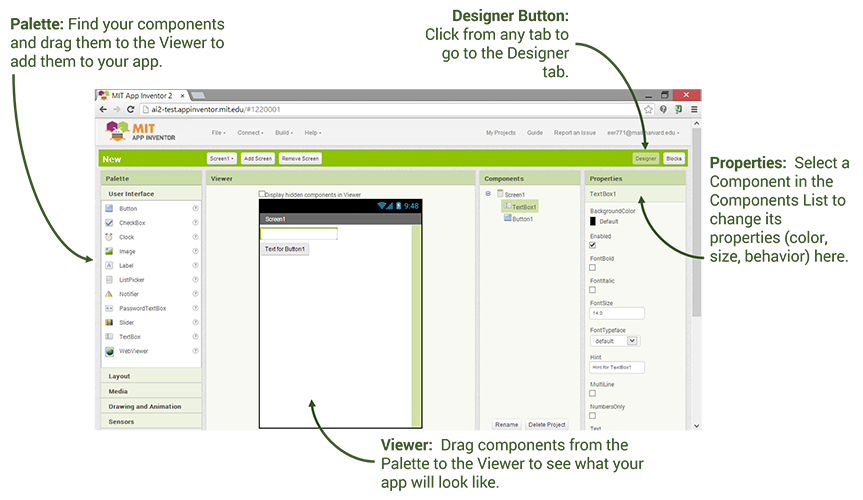
The Designer Window is where the complete structure and layout of the app is planned and built. It acts like a digital workspace where students visually design their application screen before adding logic.
The Designer Window is mainly divided into different sections:
- Palette
This section contains all the components that can be used in the app. Components are grouped into categories such as:
- User Interface (Buttons, Labels, TextBoxes)
- Layout (Horizontal and Vertical Arrangements)
- Media (Images, Sounds, Camera)
- Sensors (Accelerometer, Location)
- Storage (TinyDB)
- Connectivity (Web, Bluetooth)
Students simply select a component from the Palette and drag it into the Viewer.
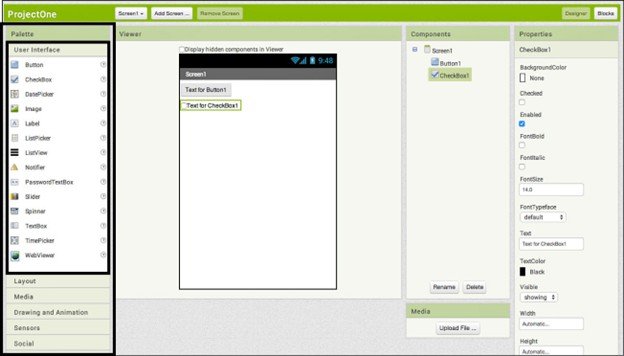
- Viewer
The Viewer looks like a mobile phone screen. This is where students arrange their components. It gives a live preview of how the app will appear on a real device. Students can move elements, resize them, and organise them properly. - Components Panel
This section shows a list of all components added to the screen. It helps students manage and rename components for better organisation. For example, instead of keeping the default name “Button1,” students can rename it to “AddButton” or “SubmitButton” to make the project clearer. - Properties Panel
The Properties panel allows students to change the settings of selected components. They can modify:
- Text displayed on buttons or labels
- Font size and style
- Background color
- Height and width
- Alignment
- Visibility
This helps students customize the appearance of their app according to their design idea.
The Designer Window mainly focuses on user interface design, which means how the app looks and feels to the user. A good design is important because it makes the app easy to use and understand.
For example:
- In a Simple Calculator, number buttons should be properly aligned in rows and columns.
- In a quiz app, questions and options should be clearly visible.
- In a game, images and controls should be placed in convenient positions.
Students also learn important design concepts such as:
- Keeping the layout simple
- Using appropriate colours
- Making text readable
- Organising components neatly
Through the Designer Window, students understand that app development is not only about logic but also about presentation. It encourages creativity while teaching structure and planning.
By practising with the Designer Window, school students gradually develop a sense of design thinking, which is an important skill in both technology and real-world problem solving.
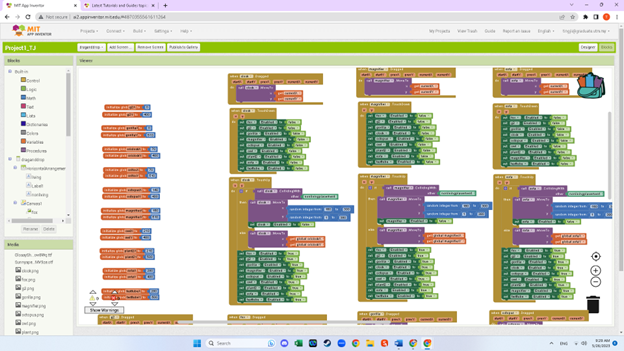
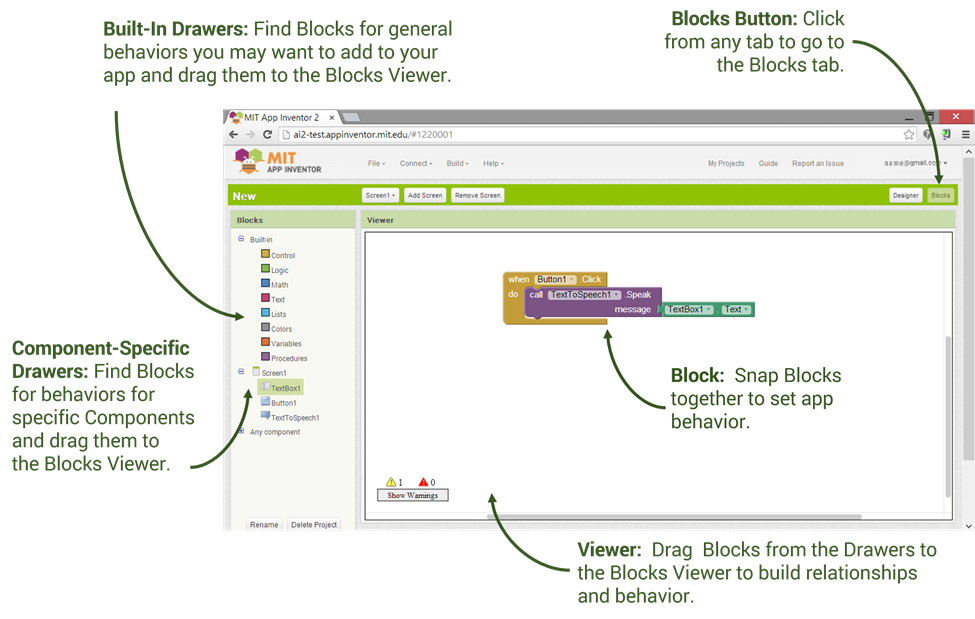
Blocks
The Blocks section is where the logic of the app is created. Instead of writing programming code, students connect colourful blocks that fit together like puzzle pieces.
Each block represents an action or instruction. For example:
- When a button is clicked
- Change the background colour
- Add two numbers
- Display a message
By joining these blocks, students define how the app behaves. This method makes programming easier to understand because it focuses on logic rather than syntax.
How It Works
The Blocks section follows a simple pattern: Event → Action → Result.
- Event Block: Tells the app when something happens.
Example: When Button. Click - Action Block: Tells the app what to do.
Example: Change background colour or display a message - Logic/Value Blocks: Perform calculations or decisions.
- Example: Add two numbers and show the result
Students drag and connect these blocks to define how the app behaves. This method makes programming easy to understand because it focuses on logic rather than complicated coding rules.
Colour- Changing App
A Color- Changing App is usually the first project beginners create. It is simple and helps students understand how events work in app development.
In this project:
- A button is added in the Designer Window.
- In the Blocks section, a rule is created.
- When the button is clicked, the background color of the screen changes.
This small project teaches event handling and property changes in a clear and practical way.
How It Works
The Color- Changing App works using an event-action rule. In app development, an event is something that happens, such as clicking a button. The action is what the app does in response to that event.
Here is how the process works step by step:
- Designing the Interface
In the Designer Window, a button is dragged onto the screen. The text of the button can be changed to something like “Change Color.” This button becomes the interactive element of the app. - Creating the Event Block
In the Blocks section, students select the button component and choose the block that says:
“When Button. Click do”
This block means: whenever the user presses the button, perform an action.
- Changing a Property
Inside the event block, students add another block that changes a property of the screen. The property used here is “BackgroundColor.”
The logic becomes:
When Button.Click → Set Screen.BackgroundColor to a specific color.
- Seeing the Result
When the app runs and the user clicks the button, the screen immediately changes its background color. This shows how an action is triggered by an event.
Magic Hat
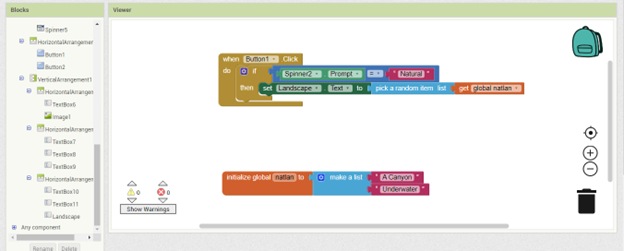
The Magic Hat app is a fun and creative beginner project. It works like a digital fortune teller where the app gives a surprise message each time the user clicks a button. Even though it looks simple, this project easily teaches very important programming concepts.
In this app:
- A button is added in the Designer Window.
- A label is used to display the result message.
- A list is created that contains multiple messages.
- A random block is used to select one message from the list.
When the user presses the button, the app selects one message randomly and displays it on the screen.

How It Works Step by Step
- First, students create a list of messages such as:
- “Today will be a great day.”
- “Keep learning something new.”
- “Success comes with practice.”
- “Believe in yourself.”
- In the Blocks section, a block is used to pick a random number within the range of the list length.
- That random number is used to select a message from the list.
- The selected message is then set as the text of the label.
Each time the button is clicked, a different message may appear. This makes the app interactive and interesting.
Simple Calculator
A Simple Calculator is another important beginner project. It helps students understand how arithmetic operations work inside an app.
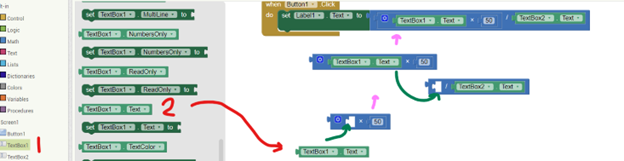
To create a Simple Calculator:
- Two input boxes are added for numbers.
- Buttons are added for operations such as addition, subtraction, multiplication, and division.
- A label is used to display the result.
In the Blocks section, mathematical blocks are used to perform calculations. This project strengthens logical thinking and connects mathematics with technology.
Why MIT App Inventor is Suitable for School Students

MIT App Inventor is designed to make learning technology easy and accessible. It removes the fear of coding and focuses on creativity and logic.
Students benefit by:
- Developing problem-solving skills
- Improving logical thinking
- Learning basic programming concepts
- Building real working Android applications
Because the platform is visual and interactive, it makes learning enjoyable and less stressful.
Read More about STEM Education
Conclusion
Building Android apps without coding is now possible for beginners through platforms like MIT App Inventor. With features such as the Designer Window and Blocks, live testing through AI Companion, and simple projects like the Color- Changing App, Magic Hat, and Simple Calculator, students can confidently begin their journey in app development.
Starting early helps students build strong technical foundations. With consistent practice and creativity, school students can turn their ideas into real mobile applications and prepare themselves for future opportunities in technology.