
This project is about smart homes which are going to be the future in these homes we don’t have to switch ON/OFF the fan and lights as whenever the temperature of the room goes below the threshold value, the fan will get switched on and when you enter from the door lights will get on automatically.
In this smart home, the PIR sensor is used for light and temperature sensors for the temperature and gas sensor to detect fire and to tone alarm.
Hardware required
- Arduino Uno R3
- Resistor
- Jumper Wires
- DC motor
- Buzzer
- Gas Sensor
- NPN transistor
- Temperature Sensor
- Light Bulb
- PIR Sensor
- Breadboard
Schematic Diagram
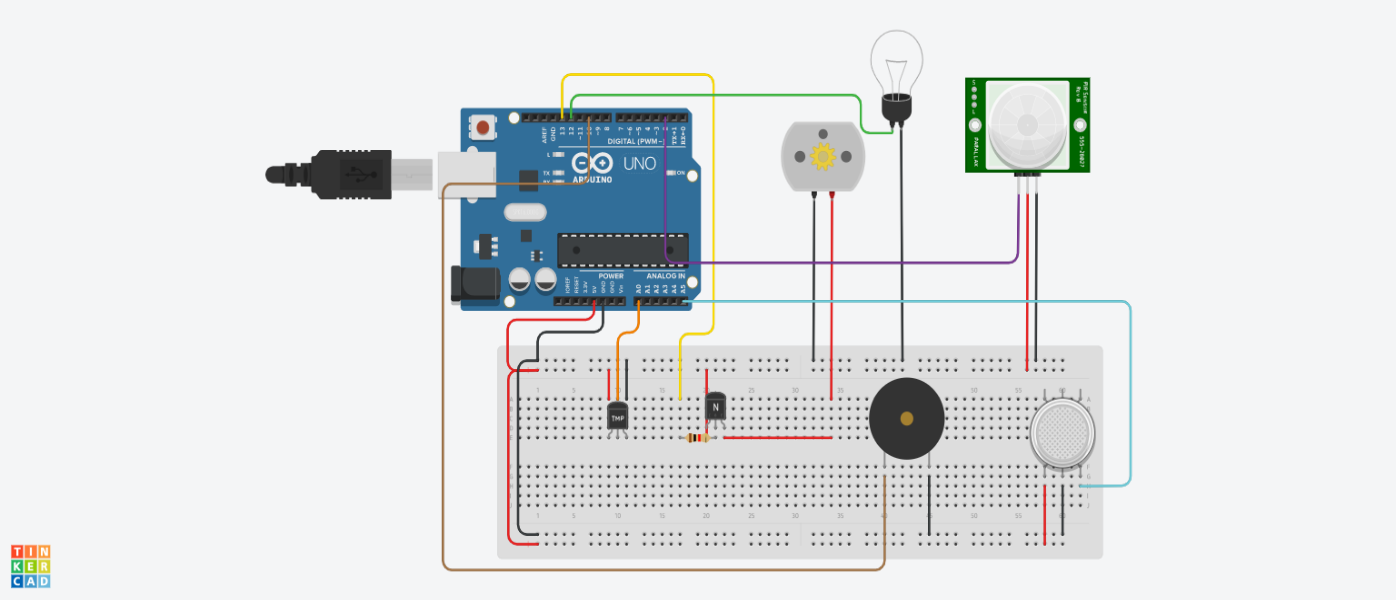
Fig 1. Circuit Diagram
Arduino Code :
const int LM35 = A0;
const int motor = 13;
const int bulb = 12;
int inputPin = 2;
int pirState = LOW;
int val = 0;
int buzzer = 10;
int smokeA1 = A5;
int sensorThres = 300;

void setup() {
  Serial.begin(9600);
  pinMode(motor, OUTPUT);
  pinMode(bulb, OUTPUT);
  pinMode(inputPin, INPUT);
  pinMode(buzzer, OUTPUT);
  pinMode(smokeA1, INPUT);
  delay(2000);

  }

void loop() {

  int value = analogRead(LM35);
  float Temperature = value * 500.0 / 1024.0;


  {
  val = digitalRead(inputPin);
  if (val == HIGH) {
    if (pirState == LOW) {
      digitalWrite(bulb, LOW);
      pirState = HIGH;
    }
  }
  else {
    if (pirState == HIGH){
        digitalWrite(bulb, HIGH);
      pirState = LOW;
    }
  }
}

  if (Temperature > 50){
    digitalWrite(motor, HIGH);

  }
  else {
    digitalWrite(motor, LOW);

  }

   delay(1000);


  int analogSensor = analogRead(smokeA1);
  Serial.print("Pin A1: ");
  Serial.println(analogSensor);
  if (analogSensor > sensorThres)

    {
      tone(buzzer, 1000, 200);
    }
  else
    {
      noTone(buzzer);
    }
  delay(100);
}
Precautions
- Connections should be made properly.
- Arduino is case Sensitive so code accordingly.
- Give different and appropriate colors to the wires.
- Use resistors for sensors and LCDs.